- 上传者: Administrator
- 上传时间:2024年02月29日 06时03分39秒
Project** Managing and completing tasks included in a project will be tiring if it is not organized in a systematic manner. Each company adopts an app ......
Project
Managing and completing tasks included in a project will be tiring if it is not organized in a systematic manner. Each company adopts an appropriate management system to simplify the control of tasks related to respective company projects. When we talk about project management, it includes planning, task creation, assigning responsible employees, recording timesheets, completing milestones, and invoicing the completed projects. What if we have an all-in-one solution for the effective management of the entire projects of a company? The latest version of Odoo will come to your help in order to manage projects in an organized way. The Project module can be used to create and record projects. Project management will be performed in a systematic manner because the user can divide a project into several tasks and milestones. It is possible to assign each task in different stages in order to understand the progression of the main project.
Odoo will lead you to the main dashboard of the project module when you click on project module. The Kanban view of the project dashboard is shown below.
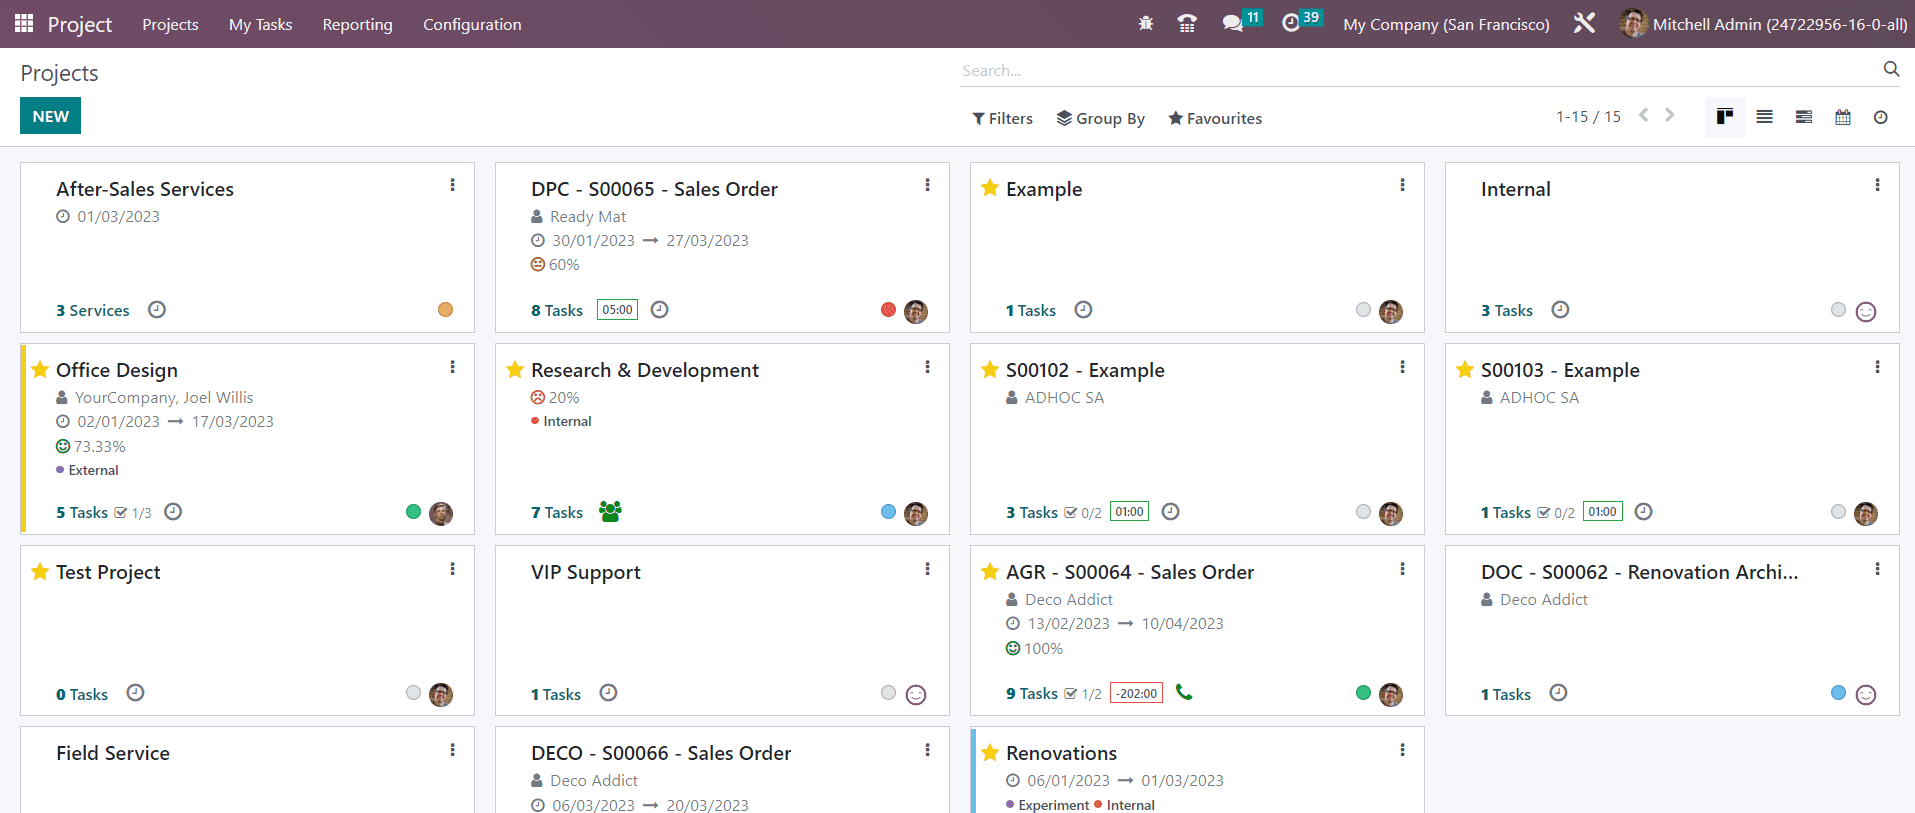
You can observe the already configured projects from the kanban view. Each project shows the scheduled date, partner, customer rating, number of tasks included, milestones, and remaining hours to complete the work. The status of each project can be seen in different colors, and each color indicates a different meaning, such as At Risk, Off Track, On Hold, and On Track. You can use the star icon to add the project to your favorites list.
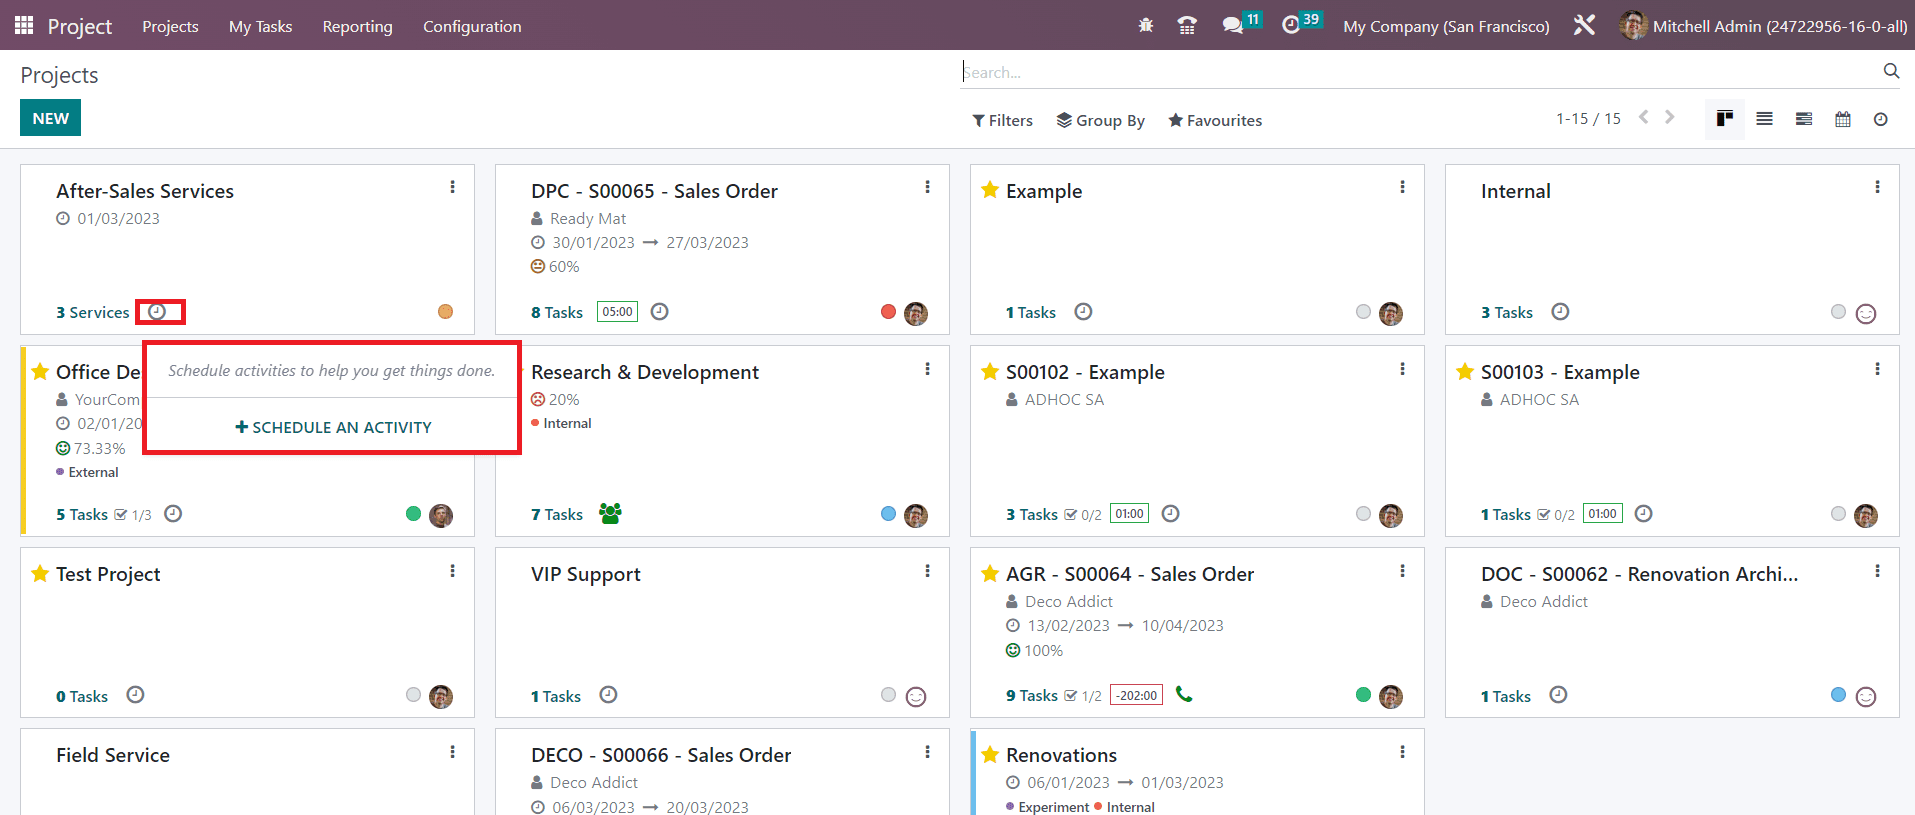
When you click on the small clock icon, you will be able to get a pop-up to schedule various activities for the respective project.
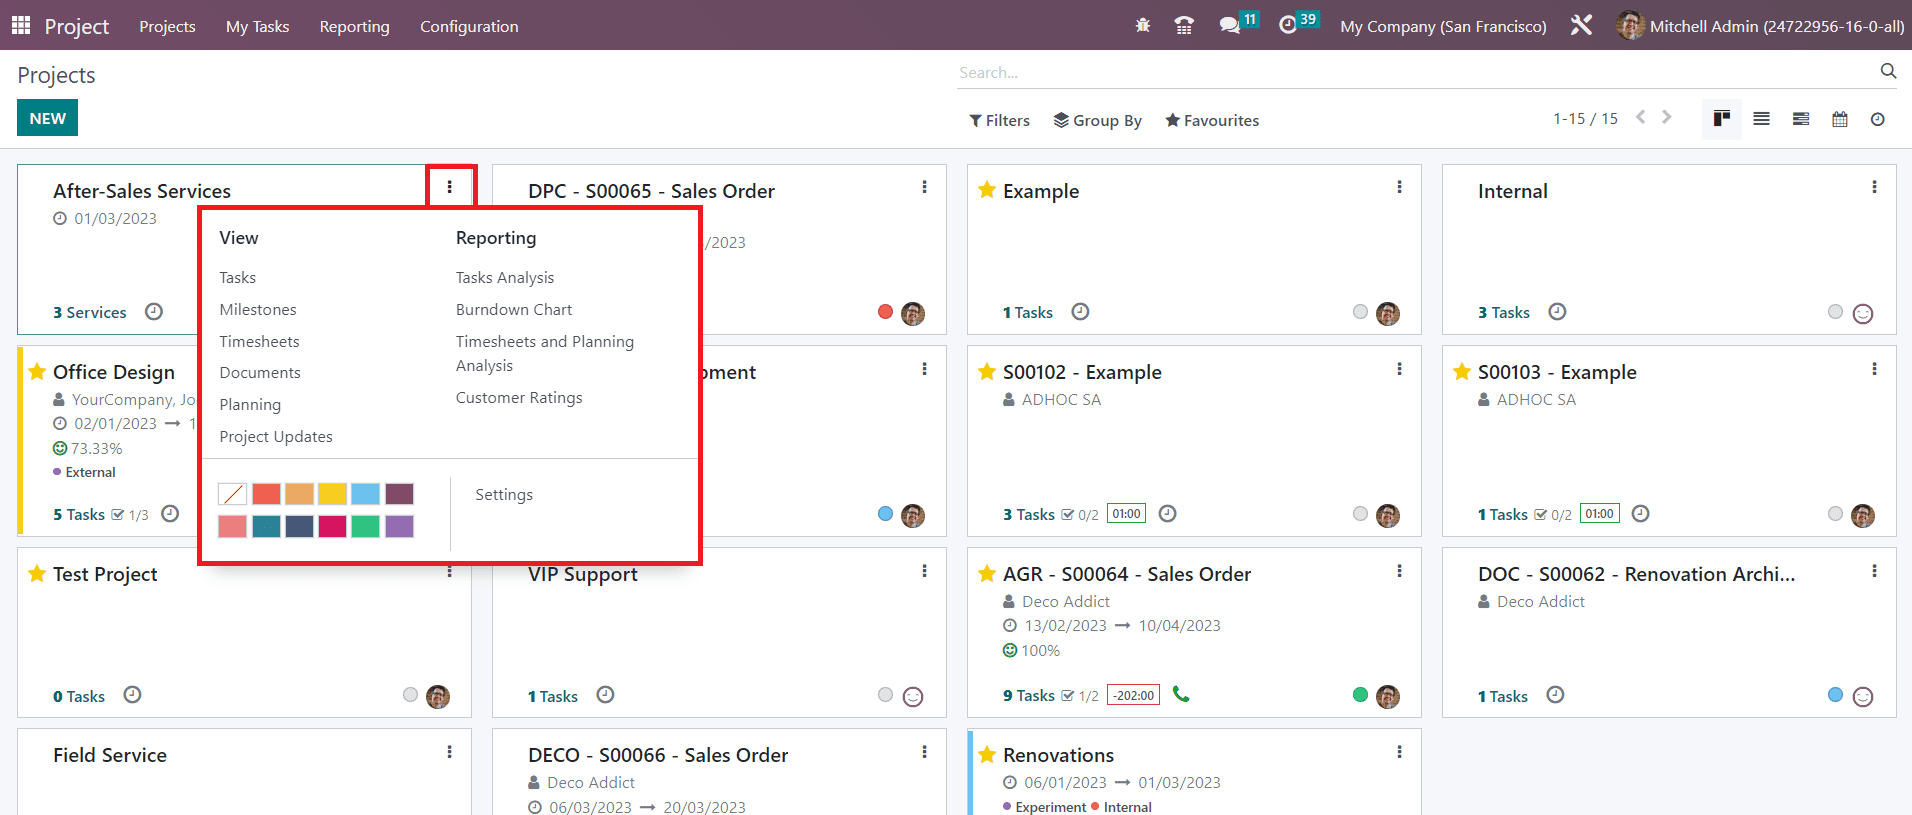
The small three dots available on the top right corner of each project will provide options to view the Task, Milestones, Timesheets, Documents, Planning, and Project Updates. This menu can be also used to get the reports of the Task Analysis, Burndown Chart, Timesheets and Planning Analysis, and Customer Ratings.
If you want to create a new project, you can click on the New button, and a pop-up will appear as shown below.
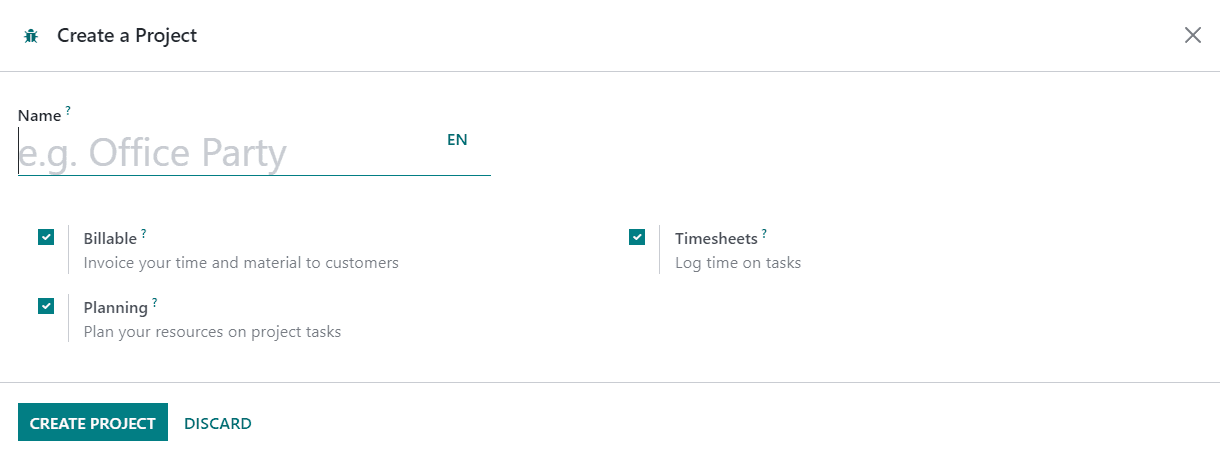
In the given space, provide the Name of the project. Activate the Billable field if you want to invoice this project to customers. You can record time on tasks under this project by activating the Timesheets field. It is possible to plan your resources on project tasks by activating the Planning button. Finally, you can click on the Create Project button which will create a new project and will lead you to a new window where you can add tasks to this project.

Before creating tasks for the project, you can set stages for the tasks. For this, you can mention the stage name in the given space and click on the Add button.
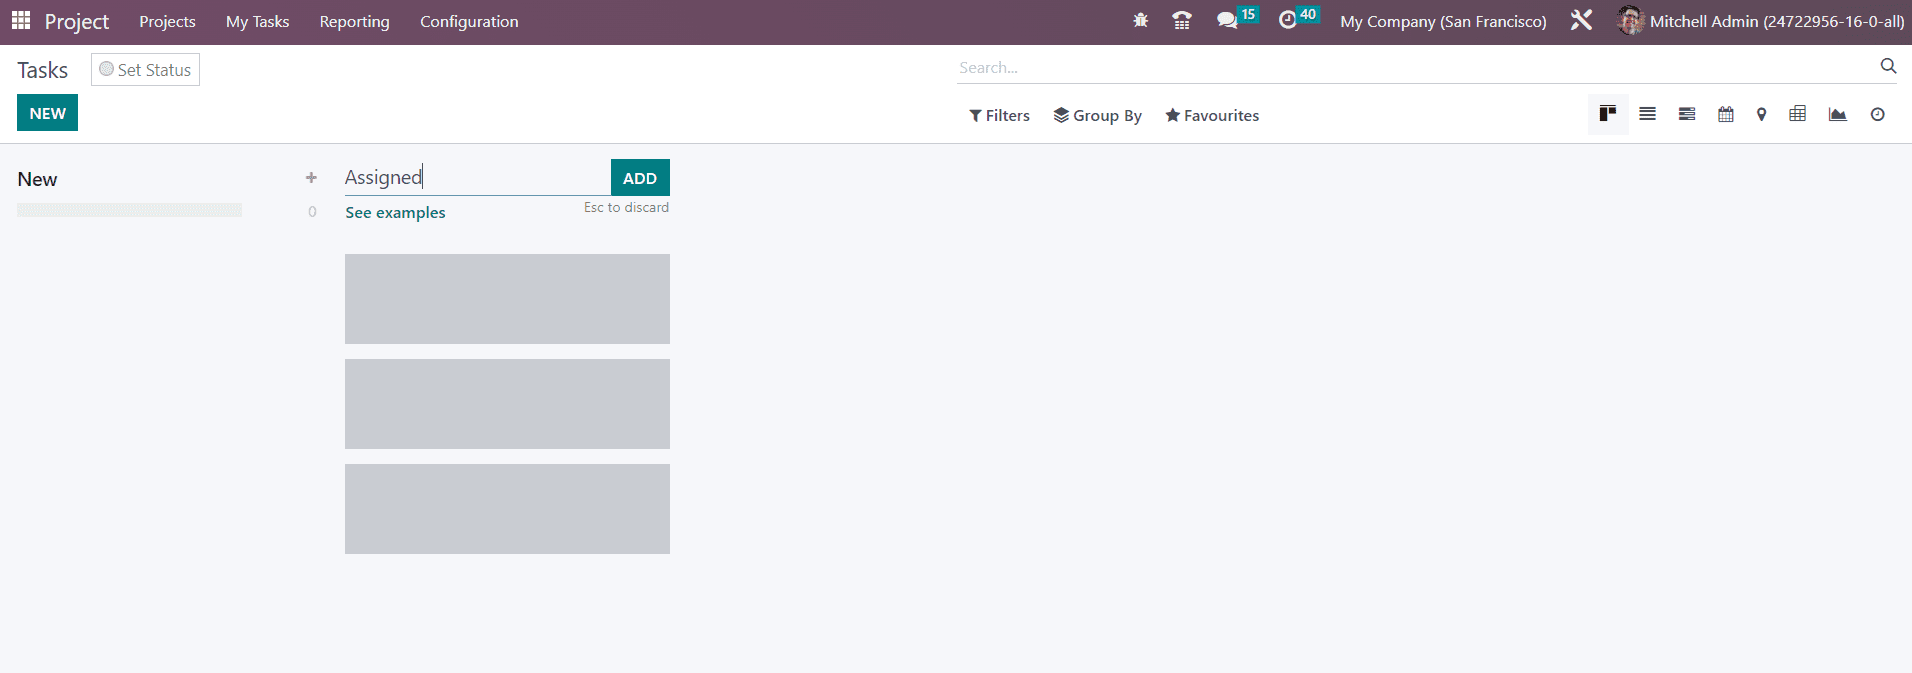
Like this, you can set new stages for the tasks.

The small settings icon available next to the title of the stage will provide options for Fold, Edit Stage, Delete, Archive All, and Unarchive All.

You can use the + icon to quickly add new tasks under a particular stage. You need to mention the Task Title and Assignees in the respective fields. For adding more details, you can click on the Edit button.
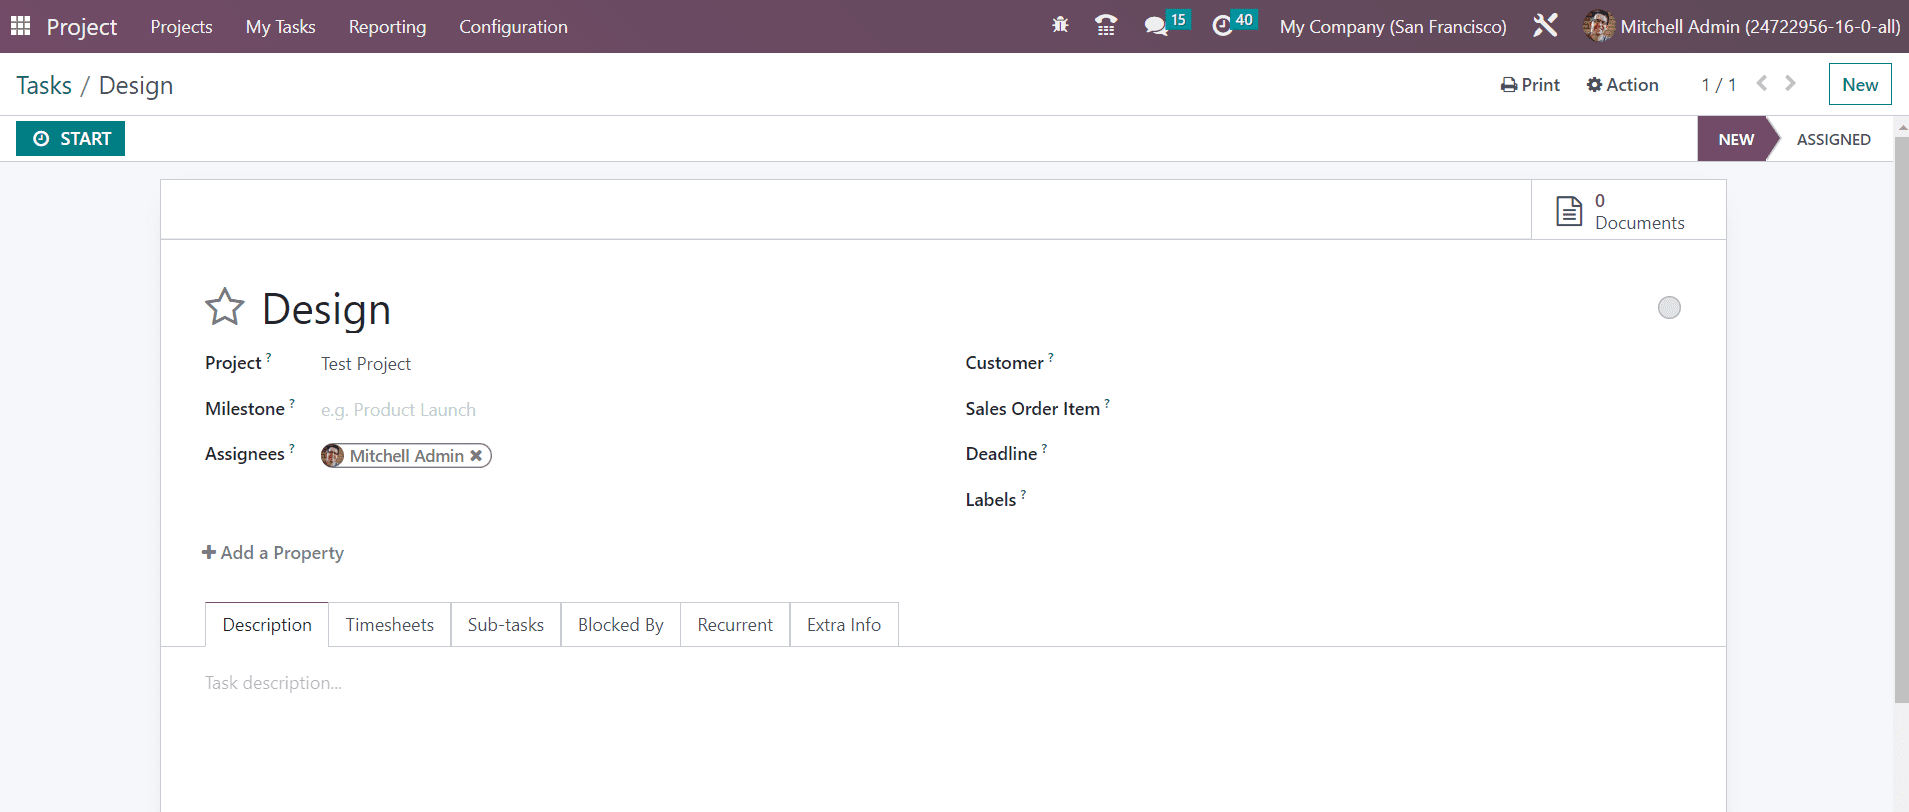
The name of the task, project, and assignees will be available here. You can mention Milestone in the given field, which will help to deliver your services automatically when a milestone is reached by linking it to a sales order item. Mention the Customer and Sales Order Item in order to invoice the time spent on the project to the respective customer. Set a Deadline for the project and add suitable Labels. Here, you will get a new option called Add a Property in Odoo 16. Using this feature, you can add new fields to the form view.
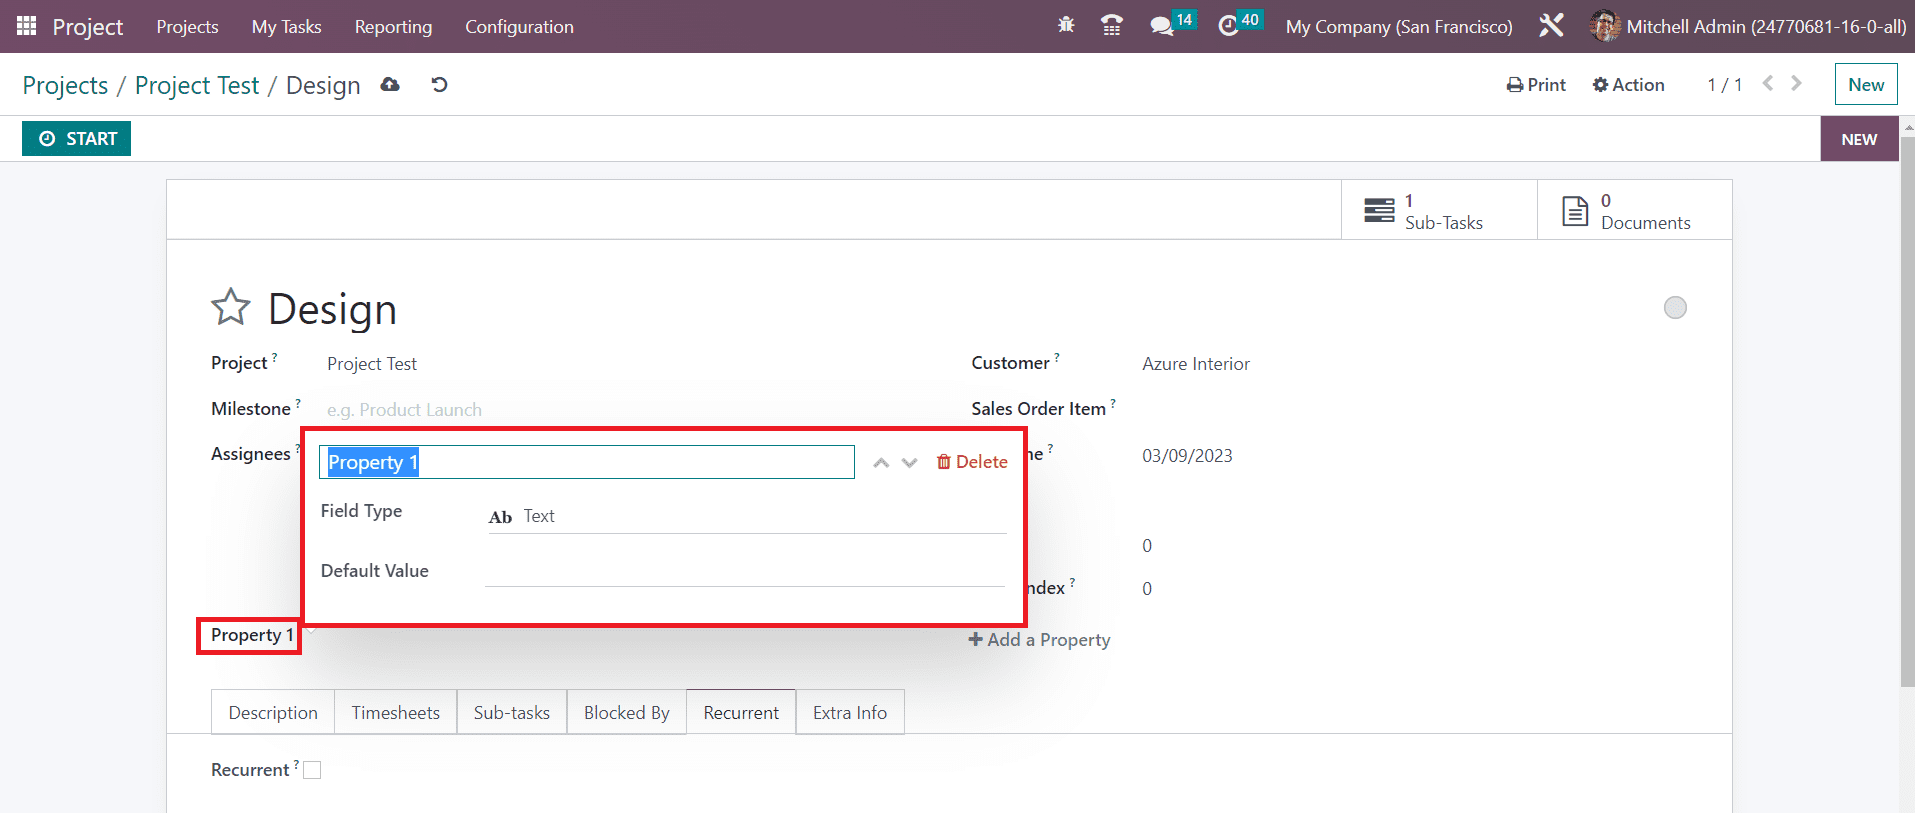
Here, you can add a title to the new field and set the Field Type. This feature will help you to expand the form view of the task.
Under the Description tab, you can add a detailed description of the task. If you want to track the time spent on a project or task, you can activate the Timesheet option from the Settings menu of the module.
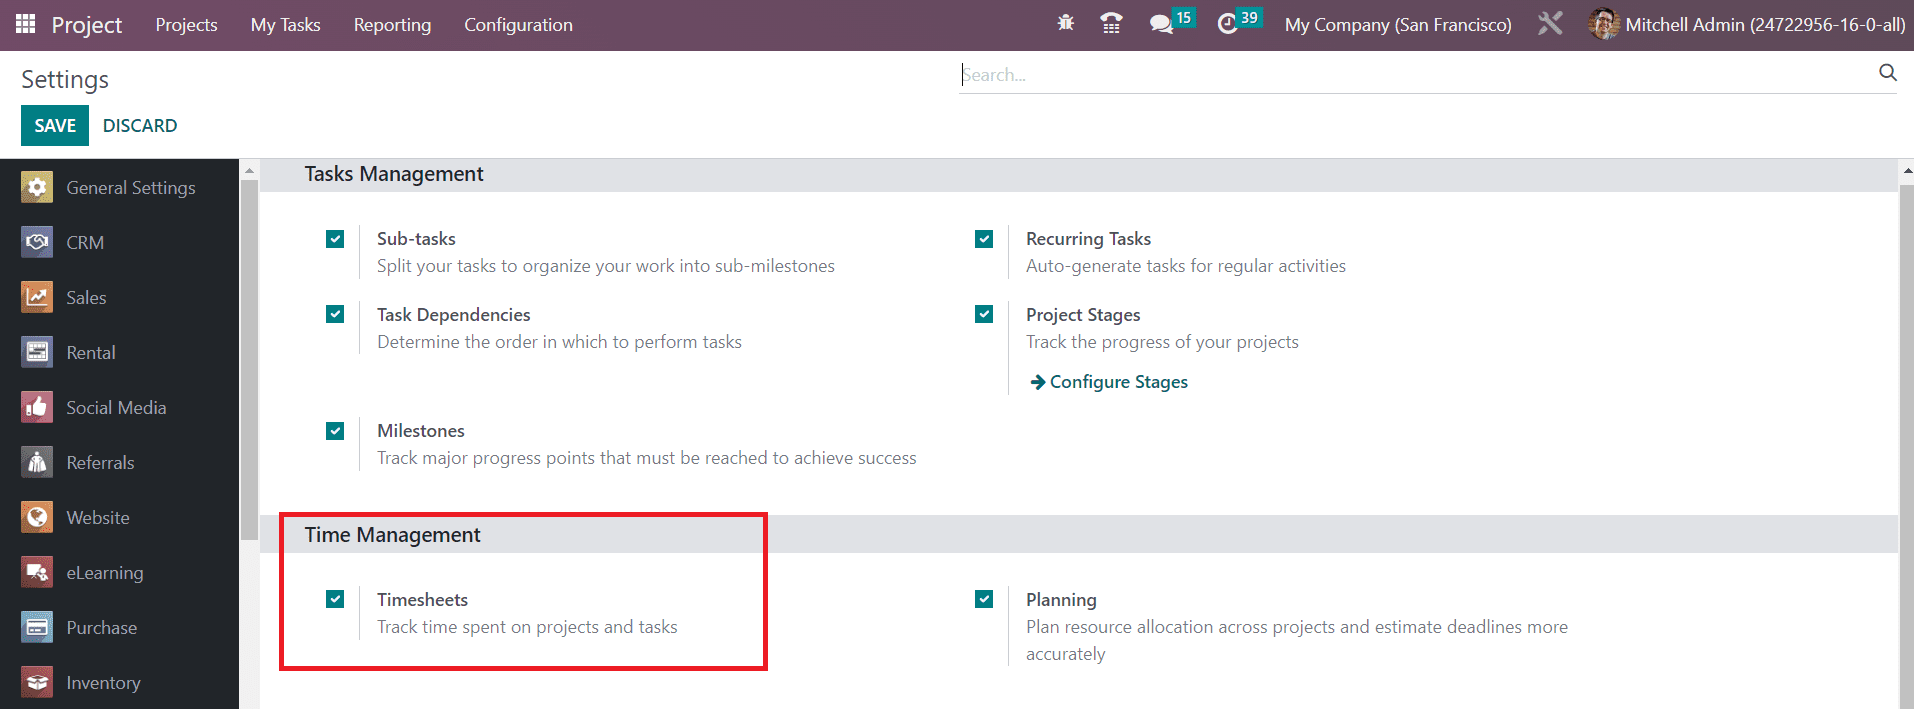
After activating this option, you will get the Timesheet tab in the form view of the task as default.
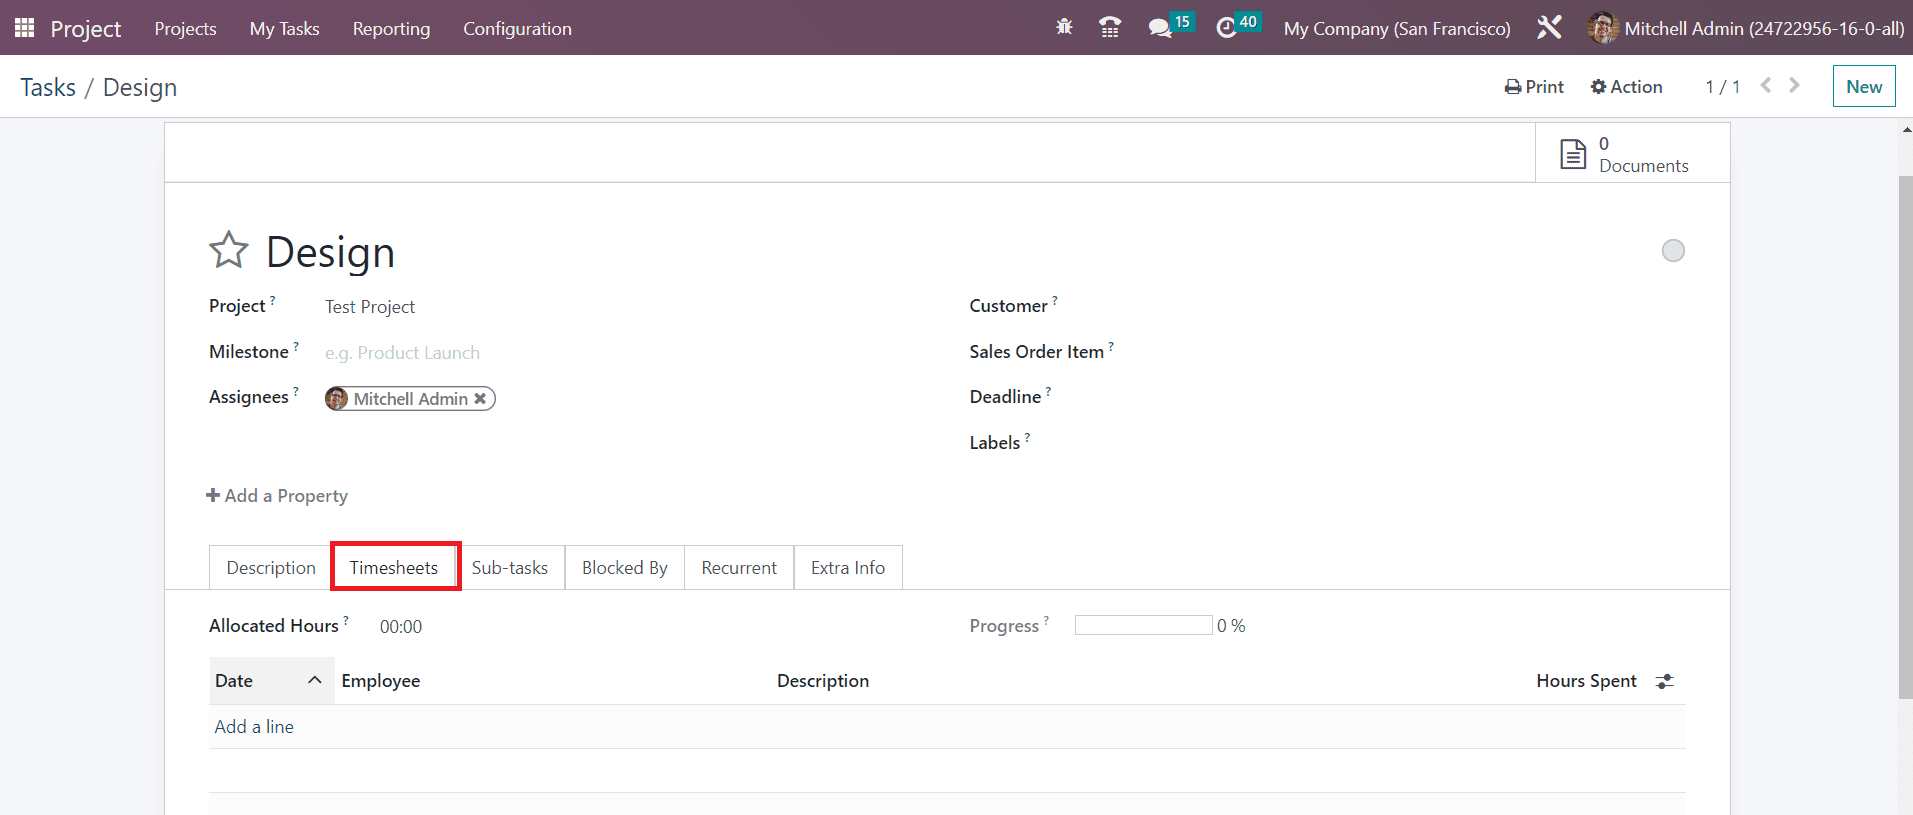
The planned hours can be mentioned in the Allocated Hours field. You can manually record the time worked by the employees using the Add a Line button. Based on the total hours spent on the task, you will get the Progress of the task under this tab.
It is possible to split your tasks into sub-milestones to organize the project smoothly. Go to the Settings menu to activate the Sub-Tasks feature.

Activating this feature will help you to create sub-tasks.
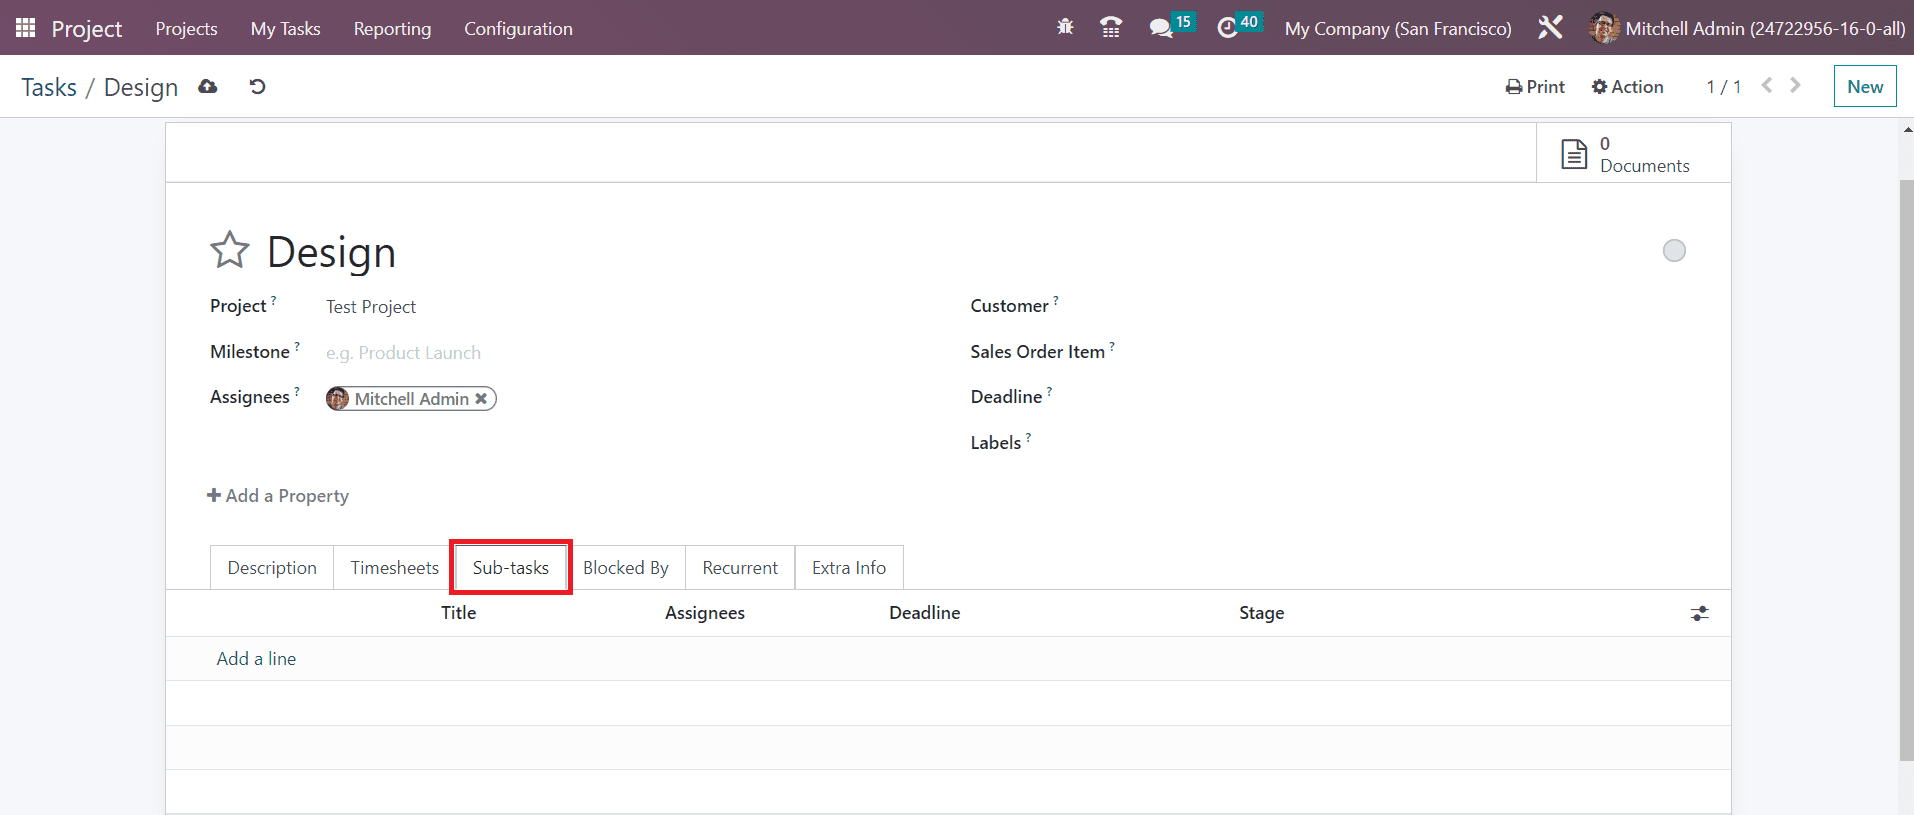
Under the Sub-Tasks tab, you can add them one by one using the Add a Line button. The details include the Title, Assignees, Deadline, and Stage. Once you add a sub-task, you will get a view task button in this tab to get a detailed view of the sub-task.
Some projects may contain various tasks to perform. In such cases, it is essential to define the order of the tasks. Go to the Settings menu, where you can find the Task Dependencies feature.

This feature will help to determine the order of the tasks to perform. When you activate this feature, you will get a new tab called Blocked By in the form view of the task.
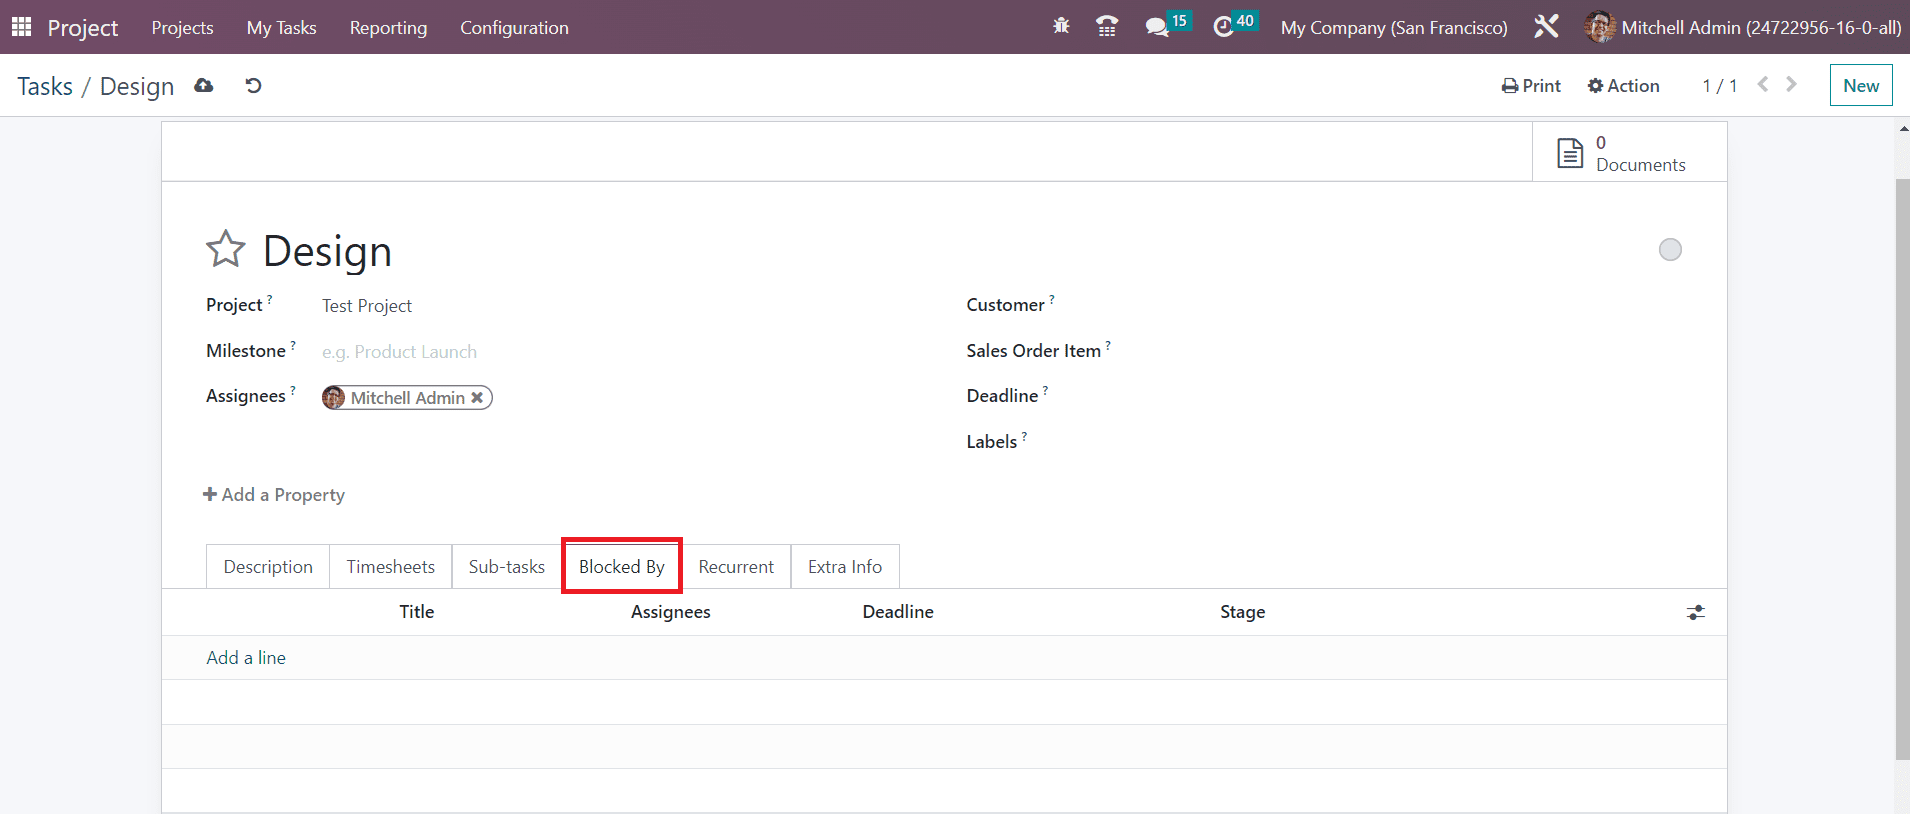
If you want to perform this task before the other task, you can block the other task by adding using the Add a Line button.
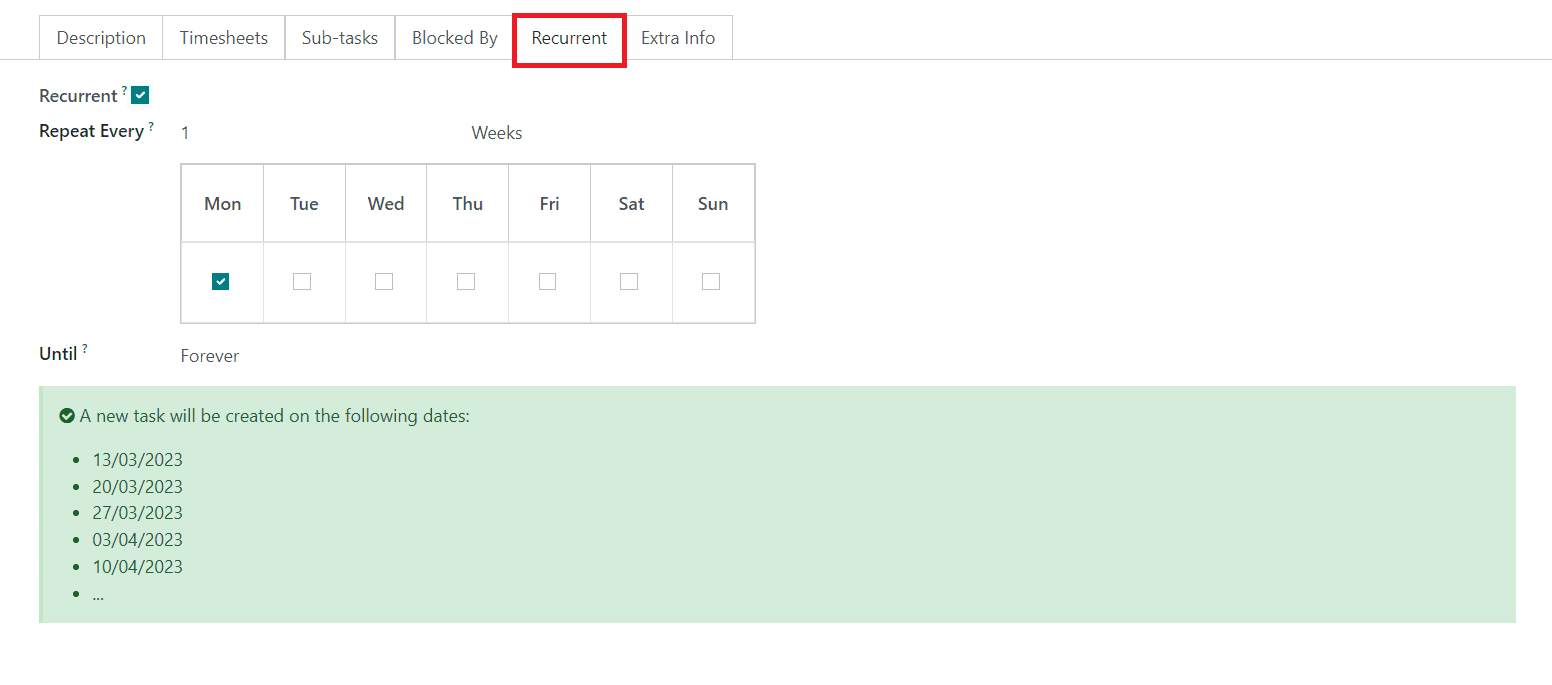
In order to repeat the task at regular intervals, you can activate the Recurrent option and mention the interval in the given field. Based on the selected interval, you will get a chart under this tab that shows the dates to perform this task.
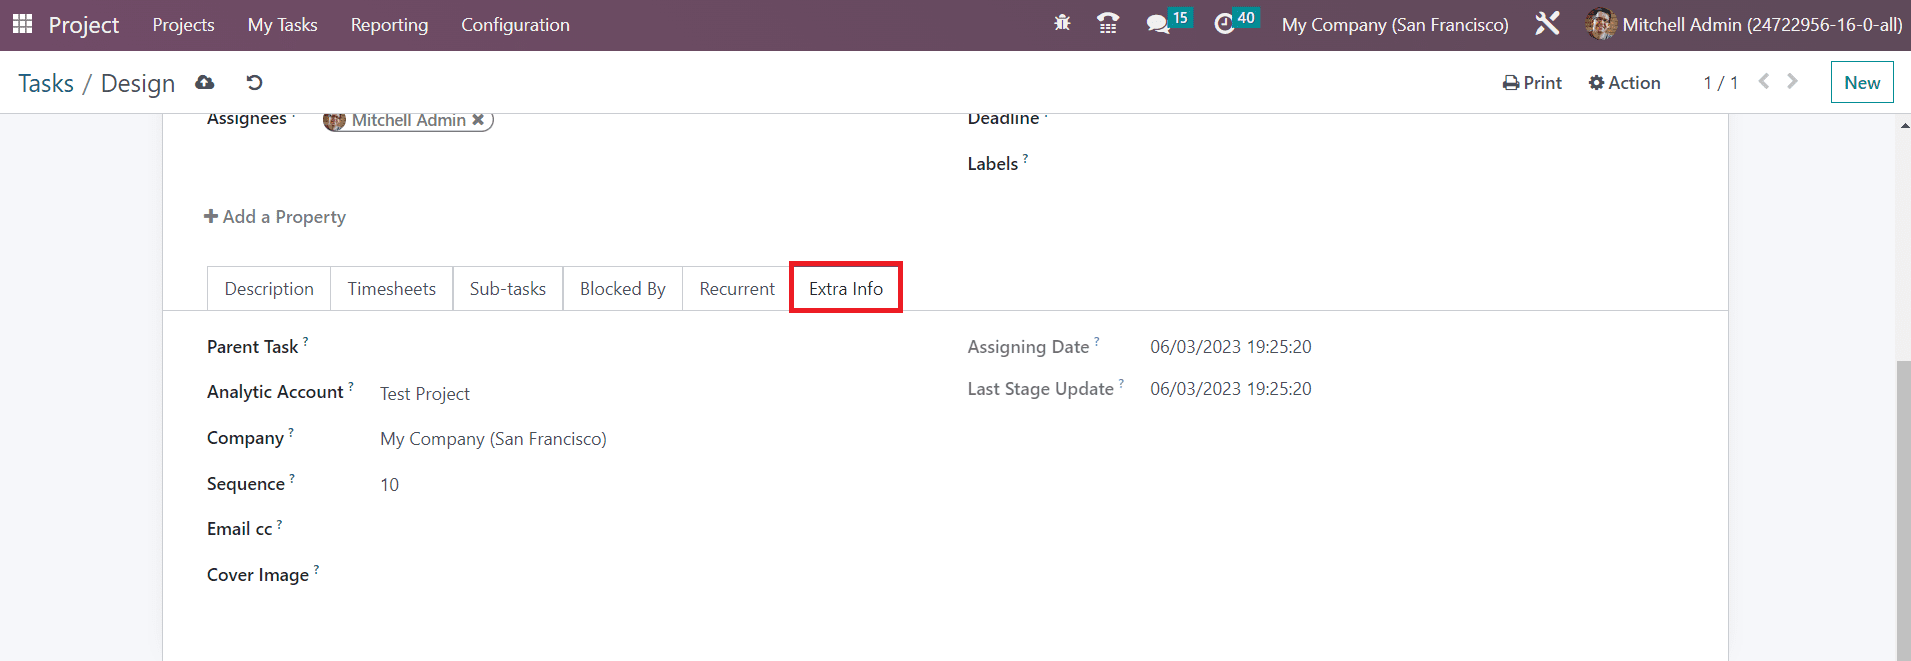
The Extra Info tab can be used to mention the Parent Task, Analytic Account, Company, Sequence, Email cc, and Cover Image. The Assigning Date and Last Stage Update will be available in the respective fields. This is how we add tasks to a new project.
Once you complete the configuration of the task, you will be able to get some smart buttons on the window, as shown in the image below.
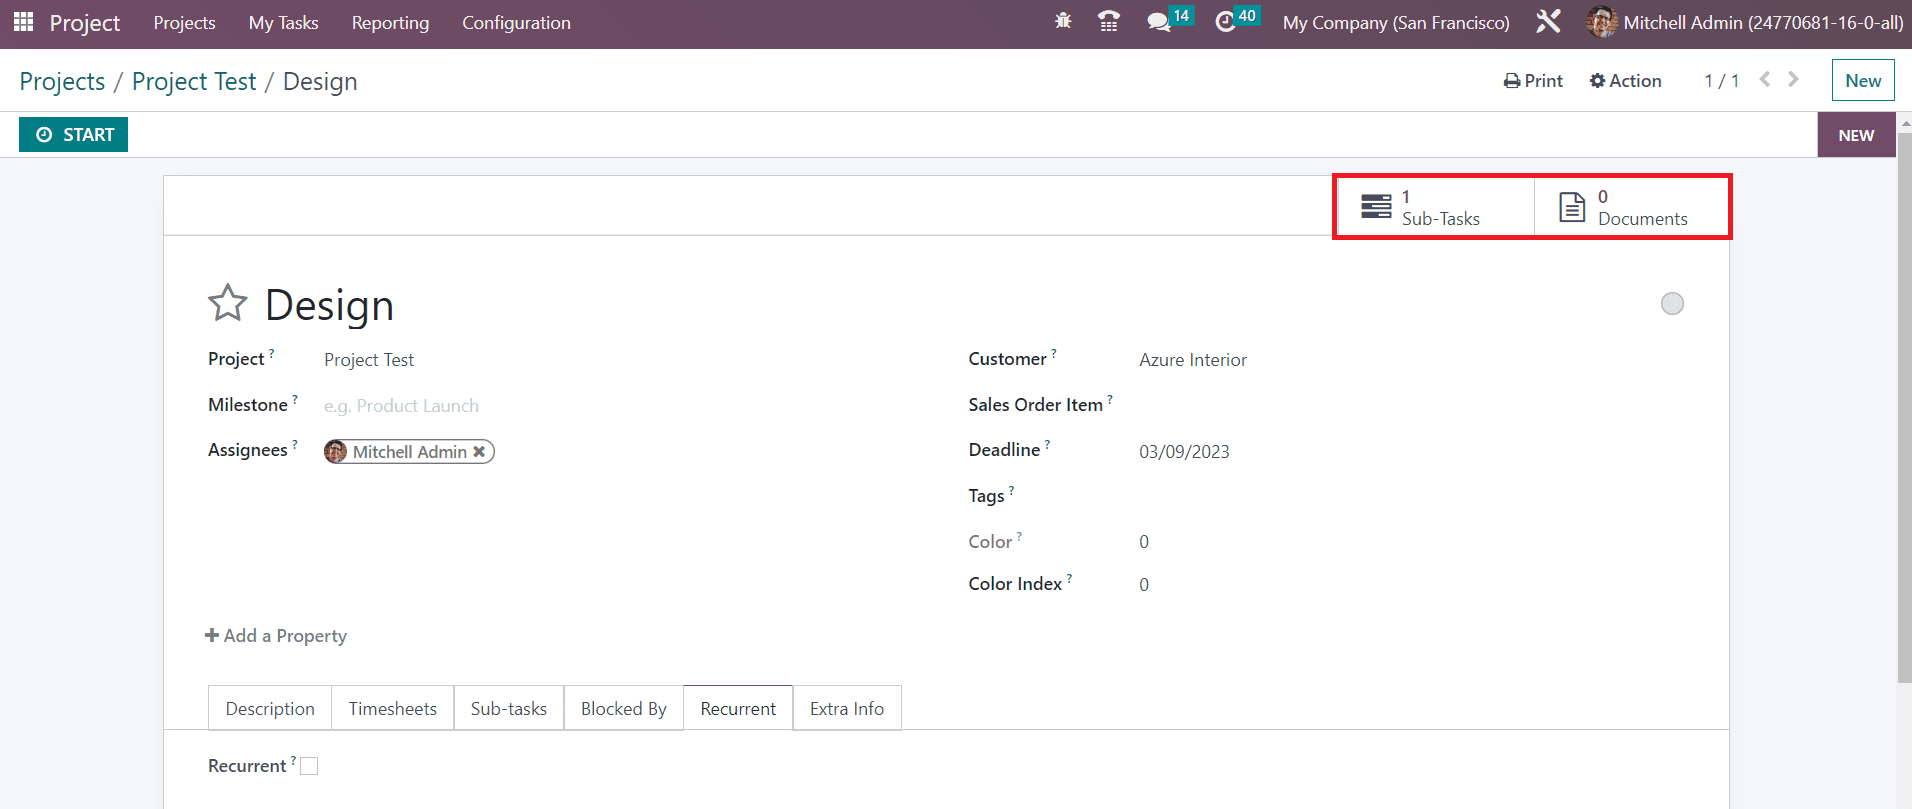
These smart buttons will show the Sub-tasks and Documents related to the current task. Here, you will get the Start button which can be used to record the time you spent on this particular task. As soon as you click on this button, Odoo will start to record the time.
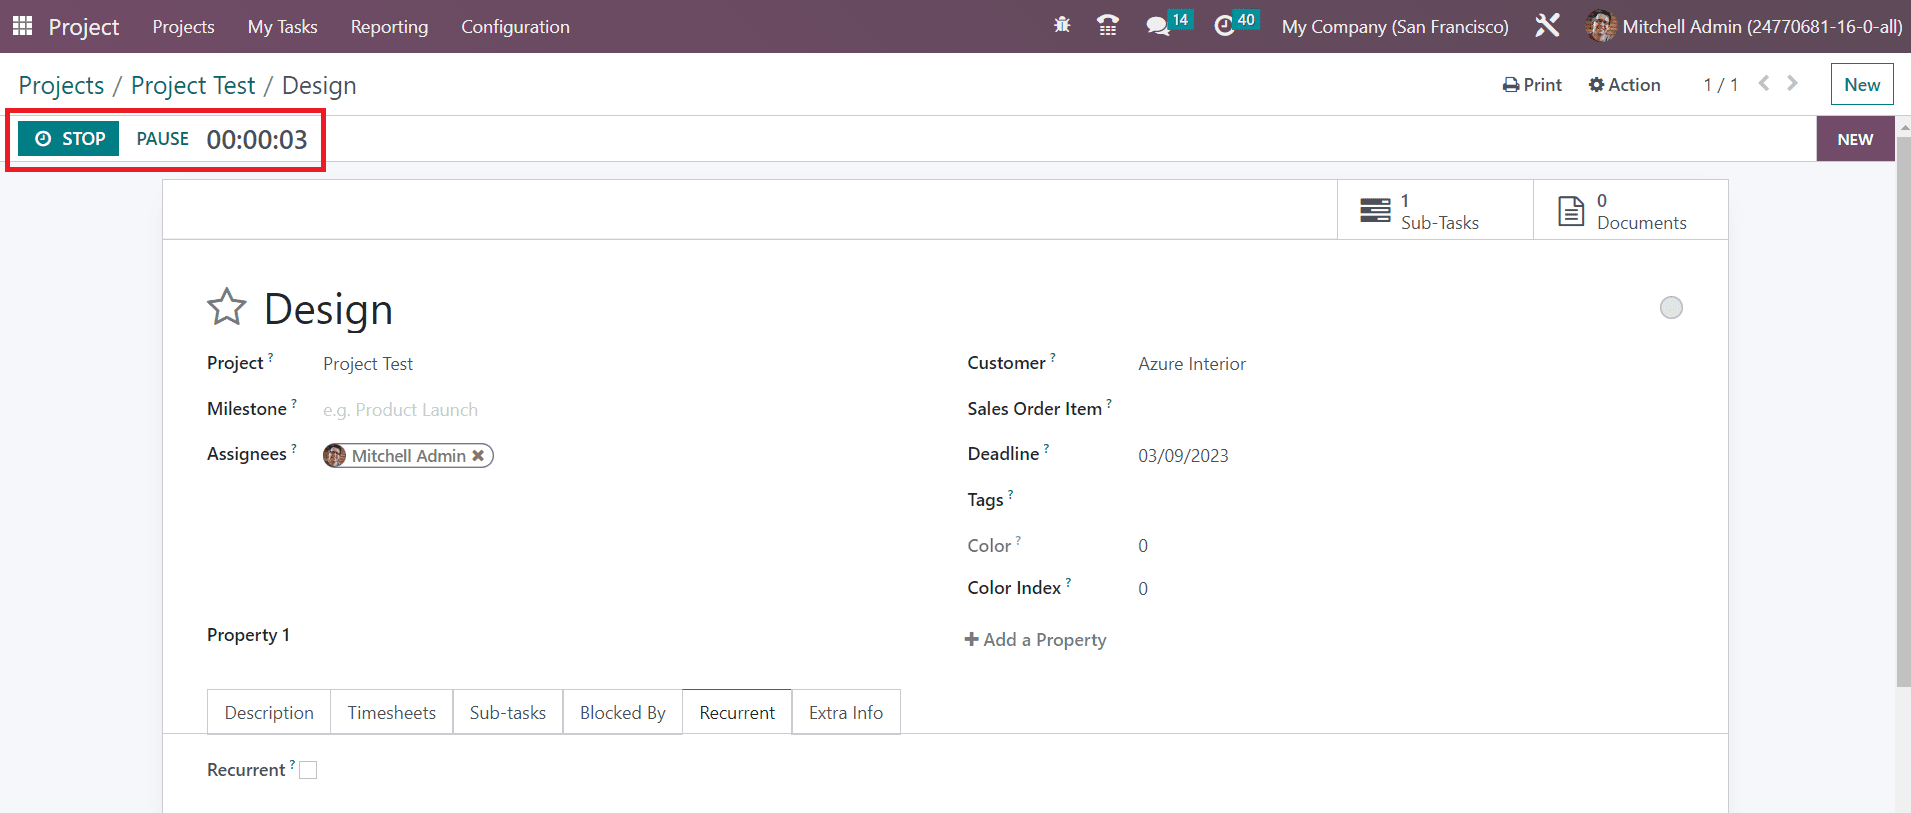
You will get the Pause and Stop buttons to perform the respective actions. After completing the task, you can click on the Stop button. This will open a pop-up window to confirm the recorded time.

The Hours Spent will be available in the pop-up window and you can add a description of your activity in the given space. Then, click on the Save button.
Now, the recorded time can be observed under the Timesheets tab of the form view.
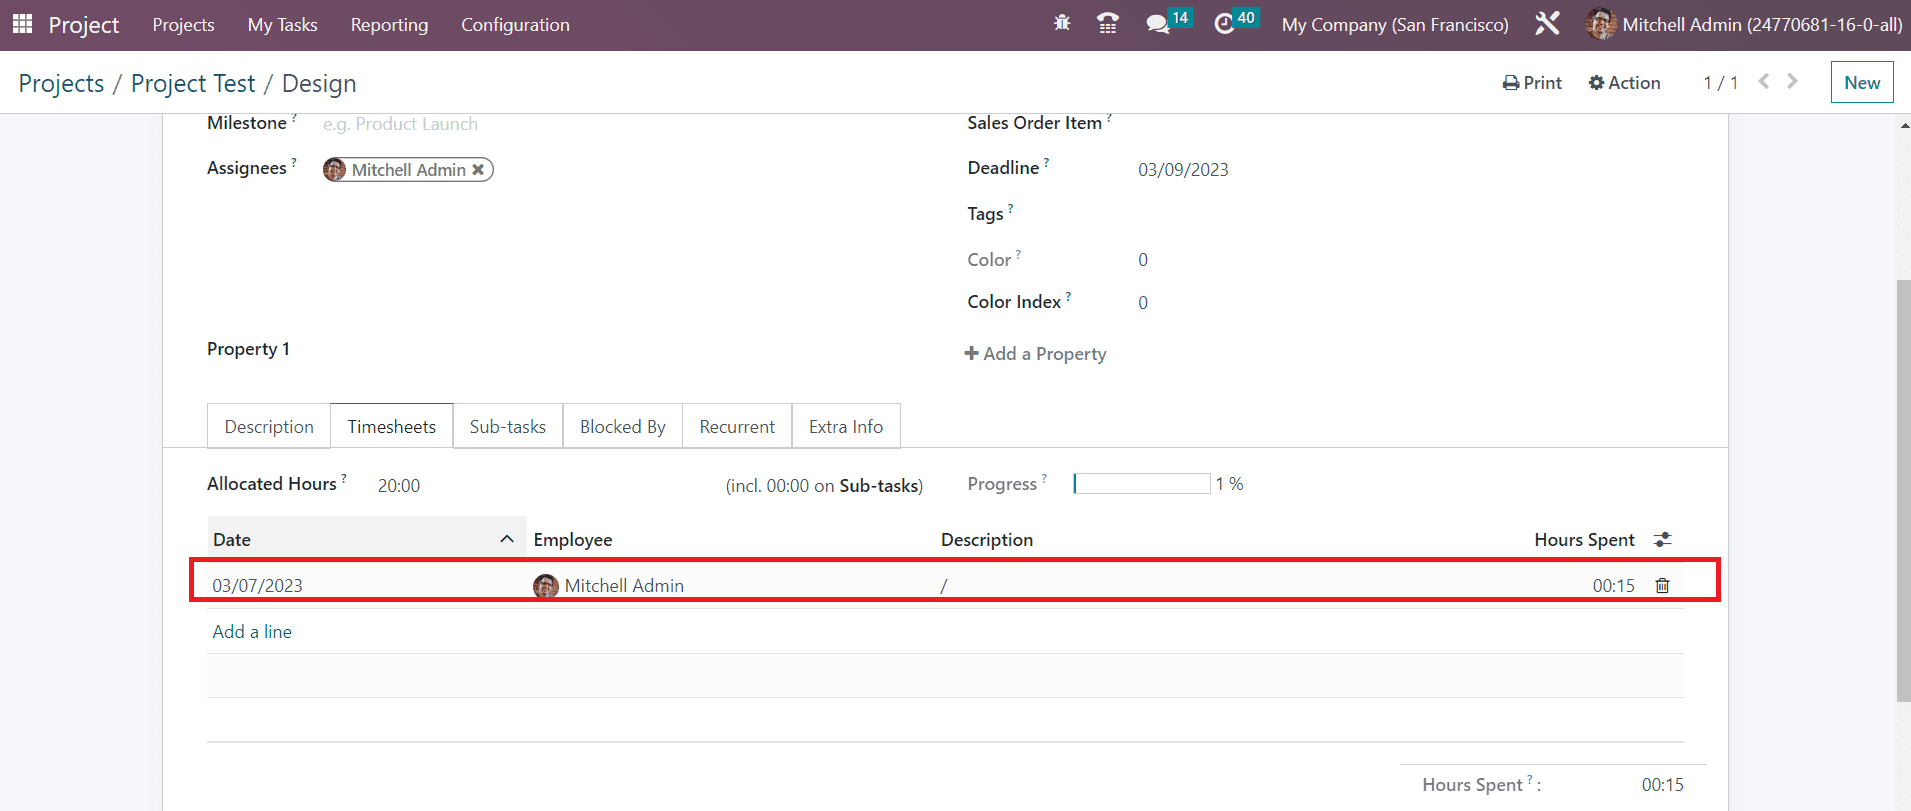
You can observe the Progress and Remaining Hours of the task in this tab.
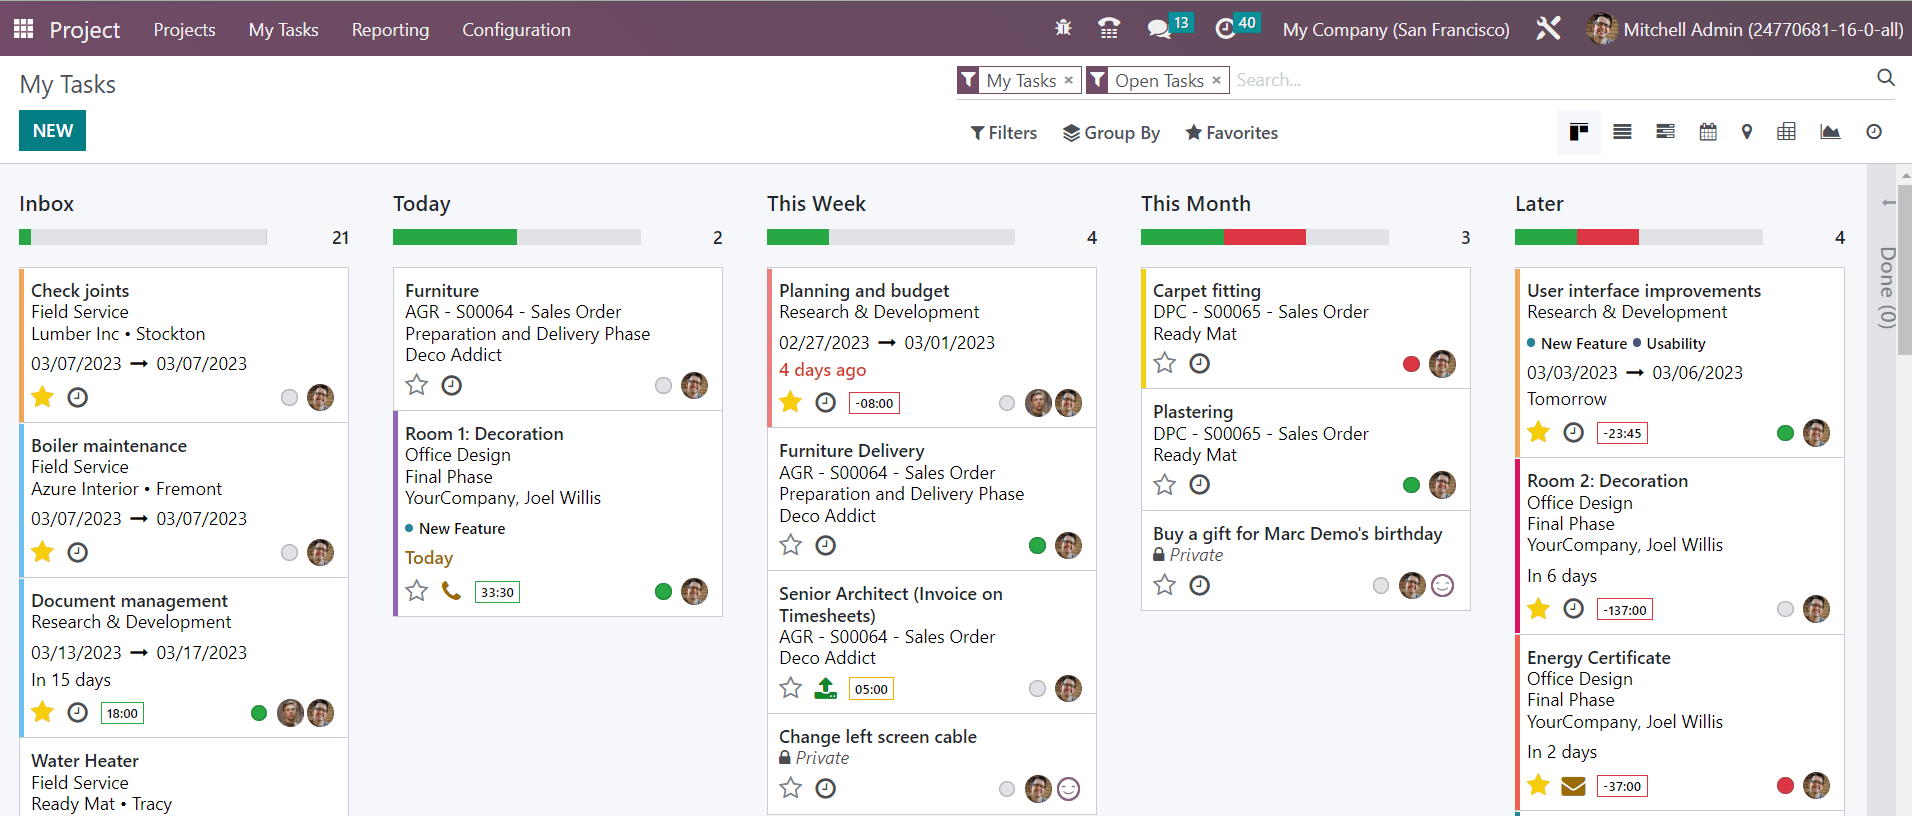
The My Tasks menu available in the Project module will record and track all tasks assigned to you. You can manage these tasks in Kanban, List, Gantt, Calendar, Activity, Map, Pivot, Graph, and Activity views.
- 微信扫一扫,一分也是爱:
-
服务原则及地区范围
宜兴通达网络科技有限公司,地处中国宜兴环科园内,是一家高新技术企业。公司在企业网络维护和企业信息化建设与咨询方面,有10多年经验。
我公司愿与客户一道,力求彻底解决客户问题!
我们不是在给企业提供“头痛医头、脚痛医脚”的暂时解决方案,而是在部署根本性安全与稳定服务!!
我们愿携手客户,建立企业IT规划;杜绝随意安装系统、软件等操作;力求共同维护有序、安全、稳定的网络办公环境!!!
IT服务,服务是根本,客户是上帝;我们提供快速响应、快速上门、快速排查,提供优质高效的服务!!!!
通达科技提供全国范围内的服务,服务形式包括远程协助、电话咨询、电子邮件咨询、传真咨询、问答平台的问题解决等。
宜兴地区提供上门服务:
- 市区服务:宜城街道、城北街道(屺亭街道)、新街街道、新庄街道、环科园、渚桥开发区
- 市郊服务:张渚镇、西渚镇、太华镇、徐舍镇、官林镇、杨巷镇、新建镇、和桥镇、高塍镇、万石镇、周铁镇、芳桥镇、丁蜀镇、湖父镇。


